Flutter: From Dart Code to Pixels
You tap a button. A number changes. Between those two moments, Flutter receives an event, changes application state, rebuilds a description of part of the interface, lays it out, paints it, and hands a scene to the device for rasterization.
That entire journey becomes easier once you own one mental model:
You describe the interface for the current state. Flutter works out how to update the screen.
By the end of this chapter, you will build a small Reading Progress app and explain how its Dart code becomes pixels. You do not need prior Dart, Flutter, or mobile-development experience. You only need to recognize basic programming ideas such as variables, functions, and classes.
1. What Flutter Actually Is
Flutter is a cross-platform user-interface toolkit. It gives you a framework, rendering system, developer tools, and platform integrations for building applications from one project.
Dart is the programming language used to write Flutter applications. Saying “Flutter code” usually means Dart code that imports Flutter libraries.
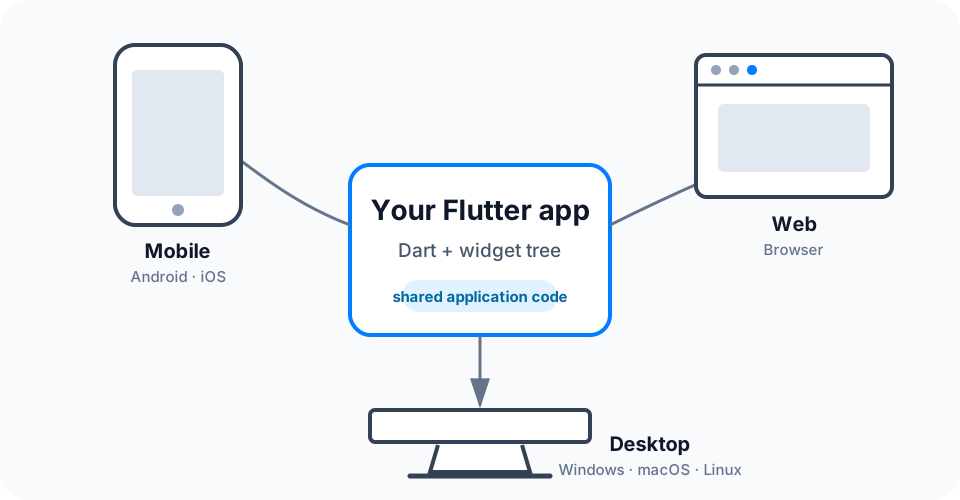
Figure 1 — Flutter lets the application share UI and business logic while still providing access to platform-specific capabilities.
Flutter can target Android, iOS, browsers, Windows, macOS, and Linux. Shared code does not mean every platform is identical. Your app might still need different navigation conventions, permissions, window layouts, input methods, or native integrations.
Three useful boundaries
- Flutter is not a language; Dart is the language.
- Flutter is not a web page inside a mobile shell; normal Flutter widgets are not HTML rendered by a WebView.
- Flutter is not merely a wrapper around Android and iOS controls; Flutter normally lays out and draws its own widget implementations.
This rendering control gives Flutter consistent visuals and a composable API. The trade-off is responsibility: a polished cross-platform app must deliberately adapt to different screens and platform expectations.
Decision rule: share behavior and design language by default; adapt where the platform changes usability, capabilities, or user expectations.
2. Read the Smallest Useful Flutter App
Start with a complete program:
import 'package:flutter/material.dart';

void main() {
  runApp(const ReadingApp());
}

class ReadingApp extends StatelessWidget {
  const ReadingApp({super.key});

  @override
  Widget build(BuildContext context) {
    return const MaterialApp(
      home: Scaffold(
        body: Center(
          child: Text('Read one page today.'),
        ),
      ),
    );
  }
}
Read it from the outside inward:
main()is the Dart entry point.runApp()gives Flutter the root widget.ReadingAppdescribes the application and never changes its own fields, so it extendsStatelessWidget.build()returns the widget description for this point in the tree.MaterialAppsupplies Material Design behavior such as navigation, themes, and text direction.Scaffoldprovides a standard visual page structure.Centerpositions its child, andTextdescribes the visible label.
The vocabulary you need
| Term | Working definition |
|---|---|
| Widget | An immutable description of part of the interface. |
| Property | Constructor data that configures a widget, such as child or title. |
| Composition | Building a larger interface by nesting small widgets. |
| Widget tree | The parent-child hierarchy formed by that nesting. |
| State | Data that may change while the app runs and can affect the UI. |
| BuildContext | A handle to a widget’s location in Flutter’s element tree. |
BuildContext is not “the screen.” It identifies a location in the tree, which lets code find nearby inherited information such as Theme.of(context). You will study its lifecycle and lookup rules later; for now, read it as “where this widget lives.”
3. Build One App, Not Six Disconnected Examples
Our Reading Progress screen has four meaningful regions.
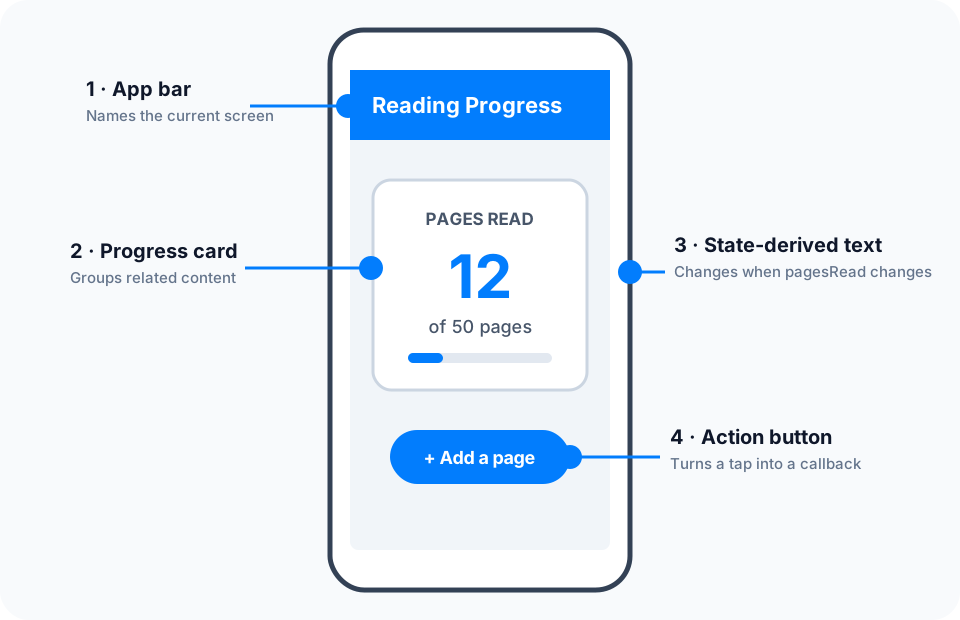
Figure 2 — The screen is a composition: the app bar names the page, the card groups progress, text reflects state, and the button produces an event.
Here is the complete main.dart:
import 'package:flutter/material.dart';

void main() {
  runApp(const ReadingApp());
}

class ReadingApp extends StatelessWidget {
  const ReadingApp({super.key});

  @override
  Widget build(BuildContext context) {
    return MaterialApp(
      debugShowCheckedModeBanner: false,
      theme: ThemeData(
        colorSchemeSeed: Colors.blue,
        useMaterial3: true,
      ),
      home: const ReadingProgressPage(),
    );
  }
}

class ReadingProgressPage extends StatefulWidget {
  const ReadingProgressPage({super.key});

  @override
  State<ReadingProgressPage> createState() => _ReadingProgressPageState();
}

class _ReadingProgressPageState extends State<ReadingProgressPage> {
  static const int readingGoal = 50;
  int pagesRead = 12;

  void _addPage() {
    if (pagesRead >= readingGoal) return;

    setState(() {
      pagesRead++;
    });
  }

  @override
  Widget build(BuildContext context) {
    final double progress = pagesRead / readingGoal;
    final bool isComplete = pagesRead >= readingGoal;

    return Scaffold(
      appBar: AppBar(
        title: const Text('Reading Progress'),
      ),
      body: Center(
        child: Padding(
          padding: const EdgeInsets.all(24),
          child: Column(
            mainAxisSize: MainAxisSize.min,
            children: [
              Card(
                child: Padding(
                  padding: const EdgeInsets.all(24),
                  child: Column(
                    children: [
                      const Text('PAGES READ'),
                      Text(
                        '$pagesRead',
                        style: Theme.of(context).textTheme.displayMedium,
                      ),
                      Text('of $readingGoal pages'),
                      const SizedBox(height: 16),
                      LinearProgressIndicator(value: progress),
                    ],
                  ),
                ),
              ),
              const SizedBox(height: 20),
              FilledButton.icon(
                onPressed: isComplete ? null : _addPage,
                icon: const Icon(Icons.add),
                label: Text(isComplete ? 'Goal complete' : 'Add a page'),
              ),
            ],
          ),
        ),
      ),
    );
  }
}
The example uses no third-party packages and can replace lib/main.dart in a new Flutter project.
Why the code is nested
Flutter favors composition over a huge screen object with hundreds of built-in settings. Center centers. Padding adds space. Column arranges children vertically. Card supplies a grouped surface. Each widget contributes one focused behavior.
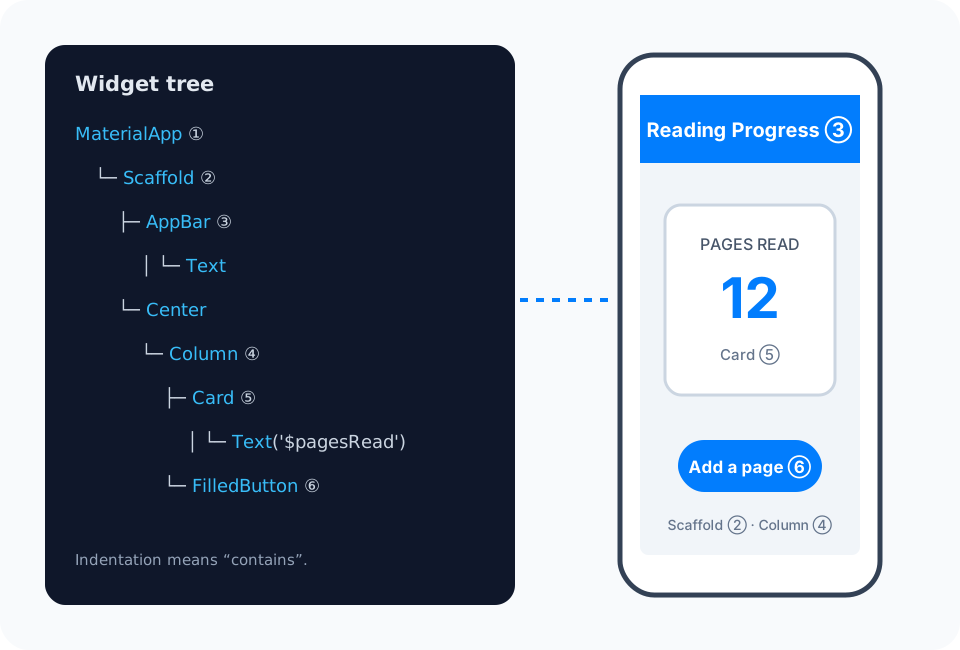
Figure 3 — Constructor nesting becomes a tree. Follow child or children to move from a parent to its descendants.
The tree shown in your source is a useful widget tree, but it is not a list of permanent screen objects. Flutter may create new widget instances whenever the description needs to be rebuilt. That is cheap by design.
4. The Core Model: UI = f(state)
The expression
UI = f(state)means: for a particular state, build() returns the interface that should exist now.
In our app:
- State:
pagesRead == 12 - UI derived from it: the large label says
12, progress is12 / 50, and the button remains enabled. - New state:
pagesRead == 50 - New UI: the label says
50, progress is full, and the button saysGoal completeand is disabled.
Imperative versus declarative thinking
An imperative approach might locate three screen controls and mutate each one:
// Conceptual imperative pseudocode—not Flutter UI code.
counterLabel.text = '13';
progressBar.value = 13 / 50;
button.enabled = true;
That creates several facts you must keep synchronized. Flutter’s declarative approach changes the source of truth and describes the result:
setState(() {
  pagesRead++;
});

// build() later derives every affected widget from pagesRead.
Text('$pagesRead');
LinearProgressIndicator(value: pagesRead / readingGoal);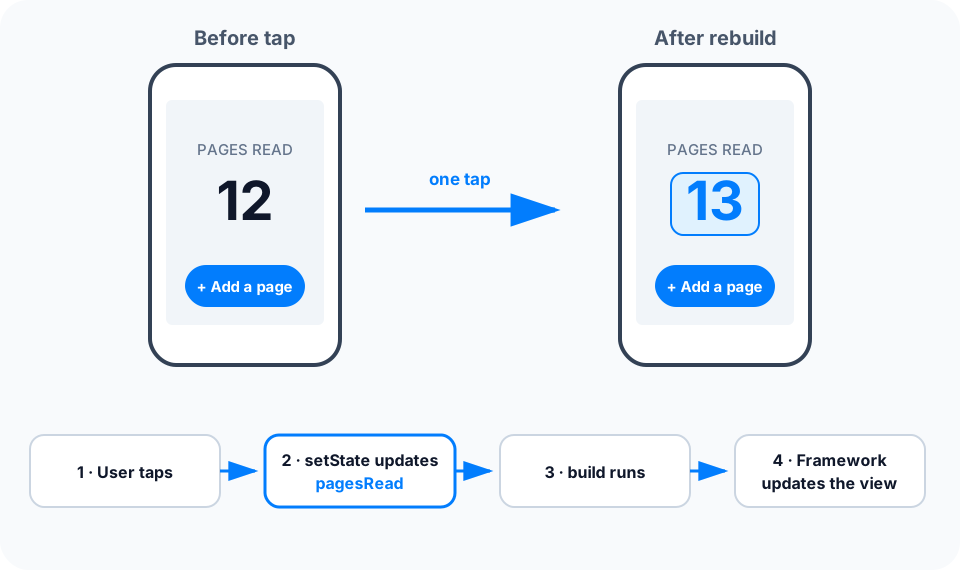
Figure 4 — setState() changes data and tells Flutter that this State object needs rebuilding; it does not directly repaint the number.
Why StatefulWidget and State are separate
Widgets are immutable descriptions. ReadingProgressPage therefore stays immutable, while its separate _ReadingProgressPageState object holds pagesRead, which changes over time.
StatelessWidgetis suitable when the widget has no mutable state of its own.StatefulWidgetcreates a persistentStateobject for data that changes during that location’s lifetime.setState(callback)performs a synchronous state mutation and marks thatStatefor a future rebuild.
Calling setState() does not rebuild the entire application, and a rebuild is not the same as repainting every pixel. Flutter schedules work and reuses persistent objects where it can.
Keep build() predictable
Flutter may call build() whenever it needs a fresh description. Therefore, build() should be fast and free of side effects.
@override
Widget build(BuildContext context) {
  // ❌ A rebuild could repeat this request.
  // final books = fetchBooksFromNetwork();

  // ✅ Read already-available state and describe the UI.
  return Text('$pagesRead pages read');
}
Fetch data, start subscriptions, or perform expensive computation outside build(), then store the result as state and render it.
5. From Widgets to Pixels
Your widget source is not sent directly to the GPU. Flutter is layered so each part has a focused job.
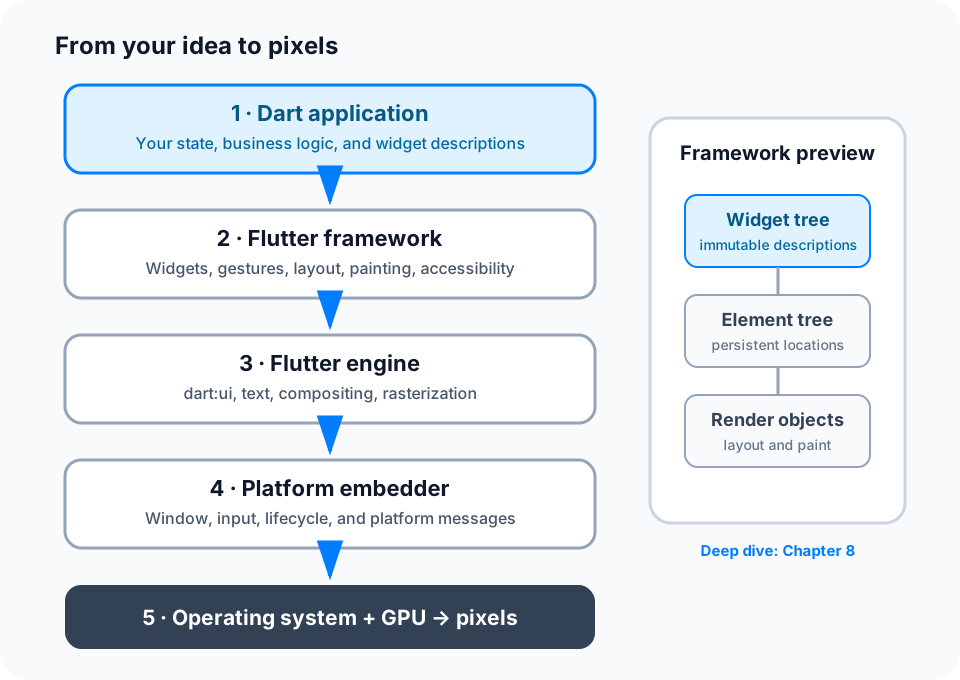
Figure 5 — The framework turns descriptions into a scene; the engine provides low-level graphics and rasterization; the embedder connects Flutter to its host platform.
Layer by layer
- Dart application: your state, business rules, callbacks, and widget descriptions.
- Flutter framework: Dart libraries for widgets, gestures, accessibility, animation, layout, painting, and more.
- Flutter engine: lower-level runtime and graphics facilities exposed to the framework through
dart:ui; it rasterizes composited scenes. - Platform embedder: connects the engine to a platform window, input, lifecycle, rendering surface, and platform messages.
- Operating system and graphics hardware: present the resulting pixels and deliver input back to the application.
A preview of the three trees
The framework uses related structures with different lifetimes:
- The widget tree contains immutable configuration objects produced by your code.
- The element tree records persistent locations in the UI hierarchy. A
BuildContextrefers to an element’s location. - The render-object tree performs work such as layout, painting, and hit testing for renderable parts of the interface.
A rebuild can create new widgets without throwing away all persistent elements and render objects. Flutter reconciles the new descriptions with what already exists. Chapter 8 covers that mechanism, Widget.canUpdate, and keys in depth.
Does Flutter use native controls?
For its normal widget UI, Flutter provides and draws its own Material, Cupertino, and foundational widgets instead of translating each one into an Android View or iOS UIView. This makes visuals composable and consistent.
Flutter can still call platform APIs through plugins or platform channels, and it can embed native platform views when a feature requires them. “Flutter draws the UI” does not mean “Flutter cannot use native capabilities.”
6. Development and Release Are Different Environments
Flutter optimizes the development loop for iteration and release builds for delivery.
| Action | Preserves current app state? | What it is for |
|---|---|---|
| Hot reload | Usually yes | Inject Dart source changes and rebuild affected UI quickly. |
| Hot restart | No | Restart the Dart application without rebuilding the full native host. |
| Full restart | No | Stop, rebuild, and relaunch everything, including native changes. |
Hot reload works in debug mode. Some changes—such as native platform code, application initialization, or certain type-shape changes—need a hot restart or full restart.
During development, Flutter uses a Dart VM to support debugging and stateful hot reload. Release builds produce optimized output for the selected target: native targets compile for their platform, while web targets produce browser-compatible output. Never judge release performance from debug mode alone.
7. Five Mistakes This Mental Model Prevents
Mistake 1: Performing work inside build()
Symptom: repeated network calls, duplicate analytics events, or dropped frames.
Rule: build() reads state and returns widgets. Put side effects and expensive work in the appropriate lifecycle, event, or data layer.
Mistake 2: Changing state without notifying Flutter
void _addPageWrong() {
  pagesRead++; // ❌ The variable changes, but no rebuild is requested.
}

void _addPage() {
  setState(() {
    pagesRead++; // ✅ Change and notification form one operation.
  });
}
Mistake 3: Treating a widget like a mutable view
Do not save a Text widget and try to change its label later. Save the data—pagesRead—and let build() create the appropriate Text description.
Mistake 4: Building one enormous widget
When a subtree represents one idea and can receive clear inputs, extract it into a focused widget. This improves naming, reuse, testing, and rebuild reasoning. Do not split every three lines: extract around responsibility, not arbitrary size.
Mistake 5: Confusing shared code with identical experiences
A desktop window, touch phone, and browser have different sizes, input devices, navigation expectations, and platform services. Reuse is a starting point; adaptability is part of production quality.
8. Guided Practice: Finish the Reading Goal
Add two behaviors without changing the app’s core model:
- Put a reset action in the app bar. Tapping it sets
pagesReadto0. - When
pagesRead >= readingGoal, showGoal complete!, fill the progress bar, and disable the add button.
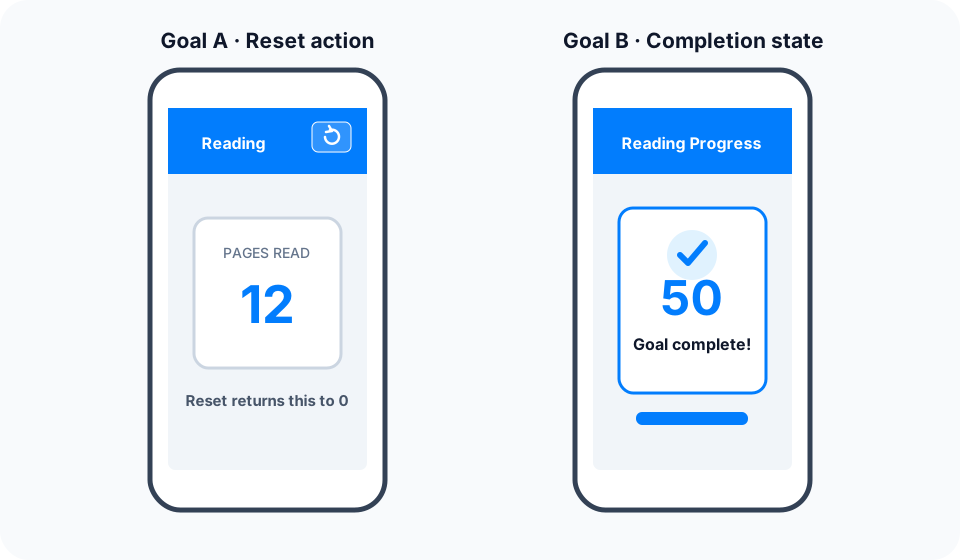
Figure 6 — Implement these two target states from data; do not manually manipulate the visible controls.
Hints
- Reset and increment are both events that change the same state.
- Derive
isCompleteinsidebuild()frompagesReadandreadingGoal. - A disabled Material button uses
onPressed: null. - Clamp the progress value if future changes could make
pagesReadexceed the goal.
Reference solution
Replace the state-changing methods with:
void _addPage() {
  if (pagesRead >= readingGoal) return;
  setState(() => pagesRead++);
}

void _resetProgress() {
  setState(() => pagesRead = 0);
}
Add the app-bar action:
appBar: AppBar(
  title: const Text('Reading Progress'),
  actions: [
    IconButton(
      onPressed: _resetProgress,
      tooltip: 'Reset progress',
      icon: const Icon(Icons.refresh),
    ),
  ],
),
Derive the completion state and use it in the UI:
final bool isComplete = pagesRead >= readingGoal;
final double progress = (pagesRead / readingGoal).clamp(0.0, 1.0);

Text(isComplete ? 'Goal complete!' : 'Keep reading'),
FilledButton.icon(
  onPressed: isComplete ? null : _addPage,
  icon: const Icon(Icons.add),
  label: Text(isComplete ? 'Goal complete' : 'Add a page'),
),
Where the book goes next
- Dart foundations: null safety, types, object orientation, asynchronous execution, and isolates.
- Framework mechanics: declarative UI,
BuildContext, lifecycle, the three trees, layout, and painting. - Application design: local and shared state, architecture, data, networking, persistence, and security.
- Production engineering: performance, testing, CI/CD, and observability.
You now have the map. The later chapters zoom into each part without changing the central idea: state changes; Flutter rebuilds a description; the framework efficiently updates what the user sees.